 LittlePaperPlanes
LittlePaperPlanes
LittlePaperPlanes
by Zella
Fix Mobile Data Not Working on Android Phone in 2023 - Smartphones are something of a necessity in the modern era. Every individual owns one for personal and business use. Nowadays, all your communication runs through Smartphones. Contacting your friend or your boss, accessing the internet – the activities are numerous.
All Smartphone process make use of Mobile Data. A malfunction in the Mobile Data processing becomes a major discomfort. There are ways to Fix Mobile Data Not Working on Android Devices.
Smartphones are like your mini-computers. Similar to a computer, Smartphones run on Operating Systems. One of the most common Mobile Operating Systems is Android: The Google Operating System.
This unique software receives periodic updates. The updates add more features to stay ahead in the market. Most Smartphones that run on these OS, update on automatic.
There are different cases for Mobile Data to Not Work. There are different Fixes to the problem for different Operating Systems. Furthermore, the cause of the problem differs for device models. But before trying to fix Cellular Data Not Working, update your Mobile to the latest OS version.
Contents
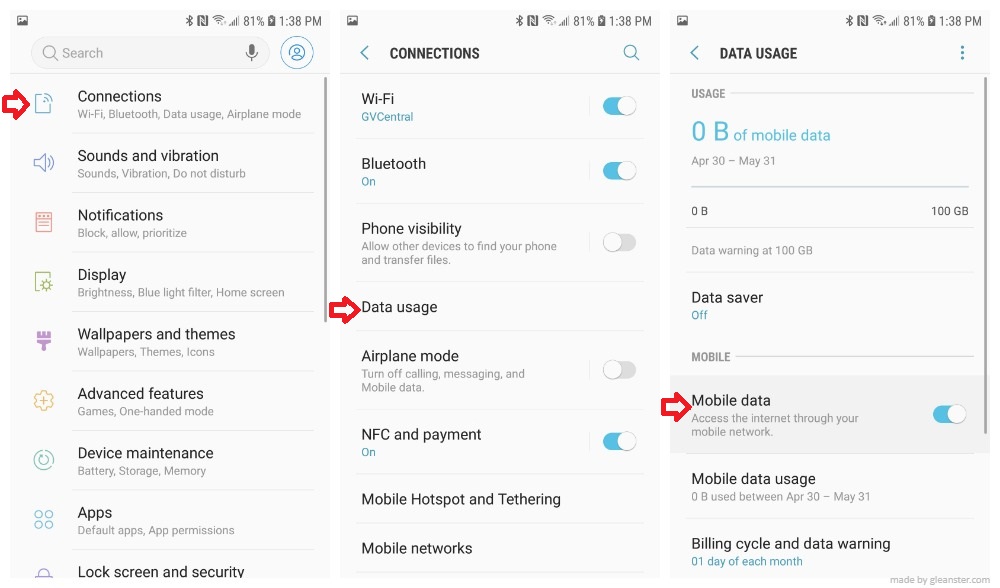
The first step is to check Mobile Data status. The Android device uses Mobile Data for different applications. The cellular data may have been off, or off for specific applications. Double-checking it may save you the hassle of finding other solutions. To check and enable Cellular Data on your Android device:
1. Go to the Home Screen. Open Mobile “Settings” by tapping the “gear” at the top.
2. Tap the “Mobile networks” or “Data usage” option.
3. Check the “Data enabled” or “Mobile data” status. If it is off, tap it to turn it on.

The Mobile has different Network Modes for data usage. Each network mode has its own purpose. Their biggest difference is the Data Transfer rate. What governs the transfer rate is the Network Bandwidth and Connection Speed.
You may also Root your Android device. Rooting unlocks new features of the Operating System. It gives you more control over the device. You gain Administrative access to the OS functionality systems. The concept goes by the name “Root Access”.
Rooted Mobiles and other Android systems may differ in the Network Mode list. All in all, you can see terms like:
· 2G: This is the 2nd Generation Mobile Network for Internet Data Transfer.
· 3G: This is the 3rd Generation Mobile Network for Internet Data Transfer.
· 4G: This is the 4th Generation Mobile Network for Internet Data Transfer.
· GSM: The GSM Network is the same as the 2G Network.
· WCDMA: The WCDMA Network is the same as the 3G Network.
· LTE: Consider this as a 4G Network. There are differences between LTE and 4G. But the networks are comparable in performance.
You must enable the preferred Network Mode to run applications. To do so on your Android device:
1. Go to the Mobile “Settings” app.
2. Open “Mobile networks”. The procedure varies with each Android Mobile. You can find it under “Wireless and networks” or the “Connections” tab.
3. Go to “Network mode”. For Dual SIM mobiles, it is under the “Dual SIM/SIM Settings”.
4. A list of Networks appears. The network options vary with your Mobile Support system. If your phone supports 4G, use “2G/3G/4G auto”.
You can go with “2G/3G auto” for a device with no 4G support.
There are options to maintain “2G only” and “3G only” connections as well.
Some network lists include “LTE”, “WCDMA”, and “GSM”. Choose the “LTE/GSM/WCDMA auto connect” option on such lists. This resembles the “2G/3G/4G auto” option. The Mobile chooses the best available network on automatic.
You can keep to “GSM/WCDMA auto connect” to stay below LTE.
Or you have the “GSM only” and “WCDMA only” options to stick to one Network.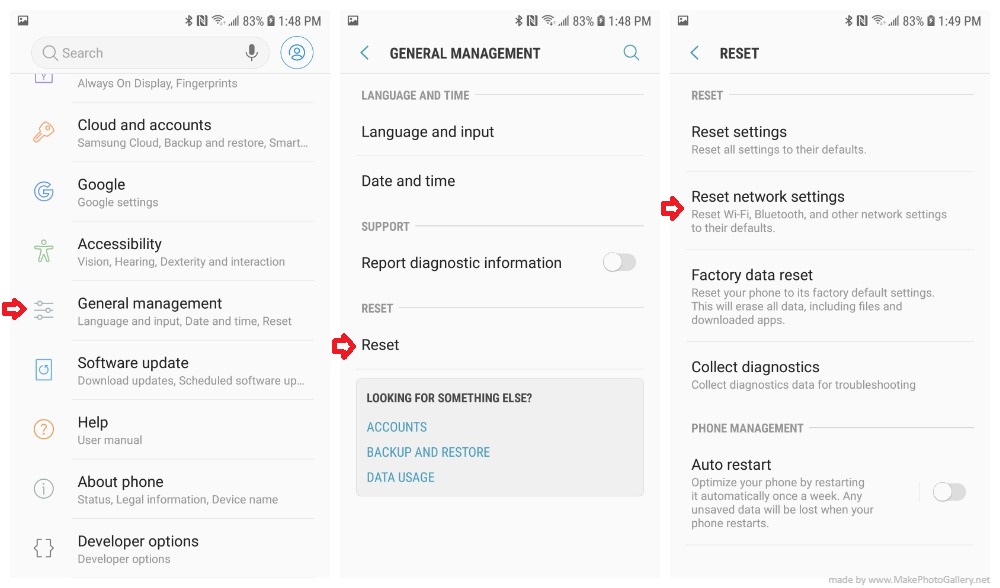
Mobile devices can develop errors connecting to Mobile Networks. Your Android device saves a new network you connect to. This includes the route to the network and the connection information. You can also set the device to connect to a network every time it is available.
But at times, your phone may not read the path to a saved Network. Resetting your Network Settings and Restarting helps resolve the issue. The process is simple on your Android device:
1. Go to the “Settings” application on the Home screen.
2. Tap “Backup and Reset”.
3. Go to “Reset Network Settings”.
4. Choose the “Reset Settings” option.
5. Input the Password or Pattern to confirm your action.
6. To restart, press the device’s power button for a few seconds. “Power off” your phone. Turn in back on after a couple of minutes.

An APN is the Access Point Name for an Android device. You can refer to it as the Mobile Carrier. The Mobile Carrier or APN is the link between your Mobile and the Network. The APN sets the path for the Network to connect to the internet. The APN sets all the specifications of a Network. Some of these include:
· The IP Address of your Mobile for the network.
· The Security Standards to access the network.
· The Privacy Levels of your Mobile on the network.
The Mobile Carrier plays a major role in the Network performance. A glitch in the Carrier results in a faulty Network connection. This leads to a failure in Mobile Data use.
Once your mobile saves the network, it also saves the wrong specifications. Your only option is to Reset the APN for your Networks. To refresh the APNs on your Android device:
1. Go to the “Settings” Application from the Home screen.
2. Open “Wireless & Networks”. This option may have the form “Wireless controls” on some mobiles.
3. Open “Mobile Networks”.
4. Go to the “Access Point Names”. This provides the list of APNs for your Network(s).
5. Tap the “Menu” to open a list of options, and choose “Reset to default”.
The control over APN settings differs for Android devices. Some devices more specifications than others for manual changes. These additional options include the APN Protocol and APN Roaming Protocol.
The APN Protocol allows you to set the IPv4 and IPv6 settings for a network.
· IPv4: It is the 4th Internet Protocol version. The IPv4 sets the host and destination for communication over the internet.
· IPv6: The IPv6 is a 128-bit extension of the Internet Protocol. It expands the IP capabilities to handle more traffic over the internet.
They are integral to communication over the internet. The network uses the IPv4 and IPv6 channels to send and receive data packets. They identify your Mobile over the internet. This helps set up a communication channel with websites.
You need to set the APN Protocol, if given the choice. The process to do so on your Android device:
1. Follow the steps to “Reset Your APN” up to Step 4.
2. Tap the Network you wish to set the APN Protocol for.
3. In the various APN Settings, scroll through, and tap on “APN Protocol”.
4. You can choose between:
a. IPv4/IPv6.
b. IPv4.
c. IPv6.
It is desirable to set the APN Protocol to“IPv4/IPv6”.
You can also create a New APN Setting for a network. This helps if you face problems with existing APN settings. There is a long list of APN settings you have to set. The APN uses these settings to connect over the internet.
Each setting has a unique pattern. You must fill in the required fields in the correct format. To set up a manual APN Network Setting on your Android Device:
1. Follow the steps to “Reset Your APN” up to Step 4.
2. Open the “Menu”, and choose the “New APN” option.
3. A list of empty APN Settings appears. You can set all the fields for the New APN. Your New APN settings must be valid for smooth Mobile Data handling.
4. “Save” the New APN from the Menu.
5. Select the New APN from the list of APN networks. Your Mobile will use the New APN settings from then on.
All Android devices have an option to set the Mobile Data Limit. You Data Limit keeps you within your economic numbers. The Android device provides a warning when you near the Data Limit. The unlimited option keeps track of Mobile Data use. But it does not give you any track of the Data its own.
You cannot use Mobile Data once it reaches its specified limit. You have to tinker with the Mobile Data Limit in such a case. To increase or have unlimited Mobile Data on your Android Device:
1. Go to the “Settings” Application.
2. Tap “Data Usage” or “Mobile Data” under the “Wireless & Networks” section.
3. The Mobile Data usage is in a graph over time. Among the settings, check the “Set Mobile Data Limit” option.
4. On the graph, you have:
a. Red Line: Move the Red line to set your Mobile Data Limit on the graph. This sets the upper limit for Mobile Data usage.
b. Orange Line:The Orange line is the Warning indicator. Once your Mobile Data usage reaches this line, you receive a warning. Move the orange line to maintain the Mobile Data Limit warning.
5. Increase the Limits on the Red and Orange line for a higher Mobile Data Limit.
Smartphones are an effective communication device in the modern world. A renowned Mobile Operating System is Android. Android devices use Mobile Data to perform various actions. It becomes a nuisance to lose control over Mobile Data on an Android Device.
The Fixto Mobile Data Not Working on Android Devices is your way to gain back control. The methods are quick and easy solutions to common Mobile Data issues. The reason for Mobile Data to not work differs for Android users. You can try the different fixes on your Android device, and use your mobile to connect to the world.

About Zella
Zella is a writer and filmmaker known for her work in the field of media arts. She hails from Tohatchi, New Mexico, and has achieved notable accomplishments throughout her career. Zella holds a bachelor's degree in Media Arts from the University of New Mexico and an MFA (Master of Fine Arts) in Creative Writing from the Institute of American Indian Arts.
 |
 |
 |
 |
Best Topics of the Day
Time for FREE Giveaways, and Free Gifts luck now
Reveal all secrets with adblock move. Hit a button below to show all
|
|
|
|